[目录]
结合实例看 maven 传递依赖与优先级
Maven 安装与配置
Maven POM
Maven 工程结构和内容被定义在一个 xml 文件中 - pom.xml,是 Project Object Model (POM) 的简称,此文件是整个 Maven 系统的基础组件。
所有 POM 文件都需要 project 元素和三个必需字段:groupId,artifactId,version。
| 节点 | 描述 |
|---|---|
| project | 工程的根标签。 |
| modelVersion | 模型版本需要设置为 4.0 |
| groupId | 这是工程组的标识。它在一个组织或者项目中通常是唯一的。例如,一个银行组织 com.companyname.project-group 拥有所有的和银行相关的项目。 |
| artifactId | 这是工程的标识。它通常是工程的名称。例如,消费者银行。groupId 和 artifactId 一起定义了 artifact 在仓库中的位置。 |
| version | 这是工程的版本号。在 artifact 的仓库中,它用来区分不同的版本。例如: com.company.bank:consumer-banking:1.0 , com.company.bank:consumer-banking:1.1 |
例子:
<project xmlns = "http://maven.apache.org/POM/4.0.0"xmlns:xsi = "http://www.w3.org/2001/XMLSchema-instance"xsi:schemaLocation = "http://maven.apache.org/POM/4.0.0http://maven.apache.org/xsd/maven-4.0.0.xsd"><!-- 模型版本 --><modelVersion>4.0.0</modelVersion><!-- 公司或者组织的唯一标志,并且配置时生成的路径也是由此生成, 如com.companyname.project-group,maven会将该项目打成的jar包放本地路径:/com/companyname/project-group --><groupId>com.companyname.project-group</groupId><!-- 项目的唯一ID,一个groupId下面可能多个项目,就是靠artifactId来区分的 --><artifactId>project</artifactId><!-- 版本号 --><version>1.0</version></project>
父(Super)POM
父(Super)POM是 Maven 默认的 POM。所有的 POM 都继承自一个父 POM(无论是否显式定义了这个父 POM)。父 POM 包含了一些可以被继承的默认设置。因此,当 Maven 发现需要下载 POM 中的 依赖时,它会到 Super POM 中配置的默认仓库 http://repo1.maven.org/maven2 去下载。
Maven 使用 effective pom(Super pom 加上工程自己的配置)来执行相关的目标,它帮助开发者在 pom.xml 中做尽可能少的配置,当然这些配置可以被重写。
使用以下命令来查看 Super POM 默认配置:
mvn help:effective-pom
Maven 构建配置文件
构建配置文件是一系列的配置项的值,可以用来设置或者覆盖 Maven 构建默认值。使用构建配置文件,你可以为不同的环境,比如说生产环境(Producation)和开发(Development)环境,定制构建方式。
配置文件在 pom.xml 文件中使用 activeProfiles 或者 profiles 元素指定,并且可以通过各种方式触发。配置文件在构建时修改 POM,并且用来给参数设定不同的目标环境(比如说,开发(Development)、测试(Testing)和生产环境(Producation)中数据库服务器的地址)。
pom.xml 中定义和使用变量
如下
properties 中定义了 mybatisplus.version
在 version 中使用
<properties><mybatisplus.version>3.1.0</mybatisplus.version></properties><dependencies><!--MyBatis-Plus--><dependency><groupId>com.baomidou</groupId><artifactId>mybatis-plus</artifactId><version>${mybatisplus.version}</version></dependency></dependencies>
pom.xml 的 parent 引用
Maven 重新导入依赖
先清除缓存
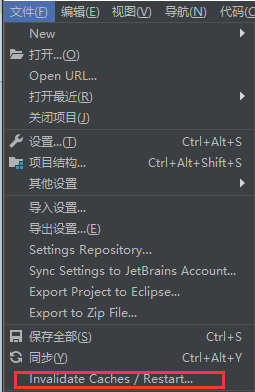
点击 Invalidate and Restart

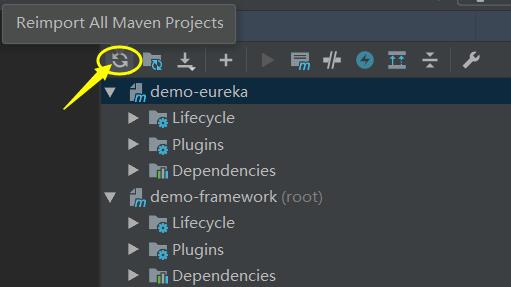
pom.xml 右键,Maven-Reimport

或者在右侧 Maven-Reimport All Maven Project
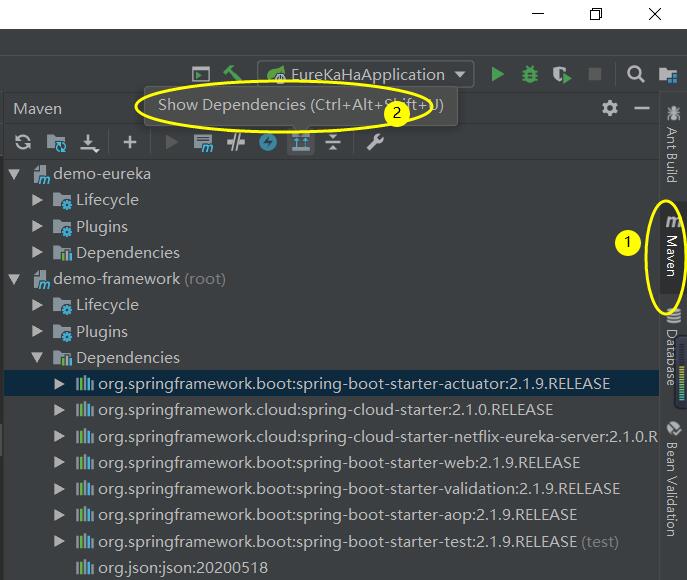
查看 Maven 依赖
右侧 Maven-Show Dependencies
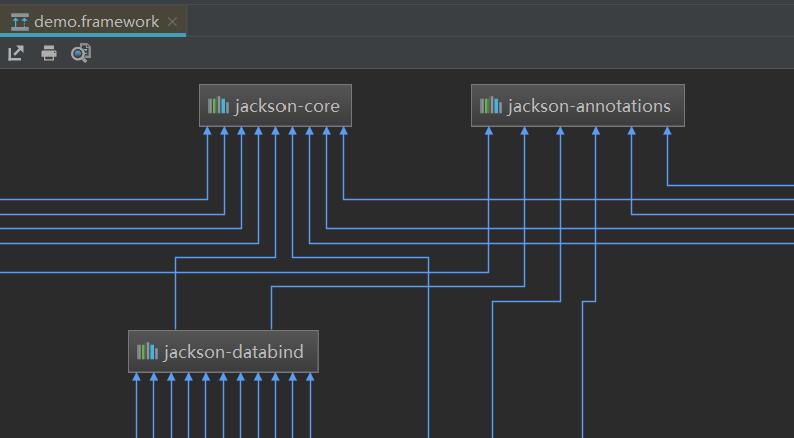
解决 jar 包冲突
手动分析
比如项目中应用了下面两个
<dependency><groupId>org.springframework</groupId><artifactId>spring-webmvc</artifactId><version>6.0.9</version></dependency><dependency><groupId>org.springframework</groupId><artifactId>spring-aop</artifactId><version>5.3.23</version></dependency>
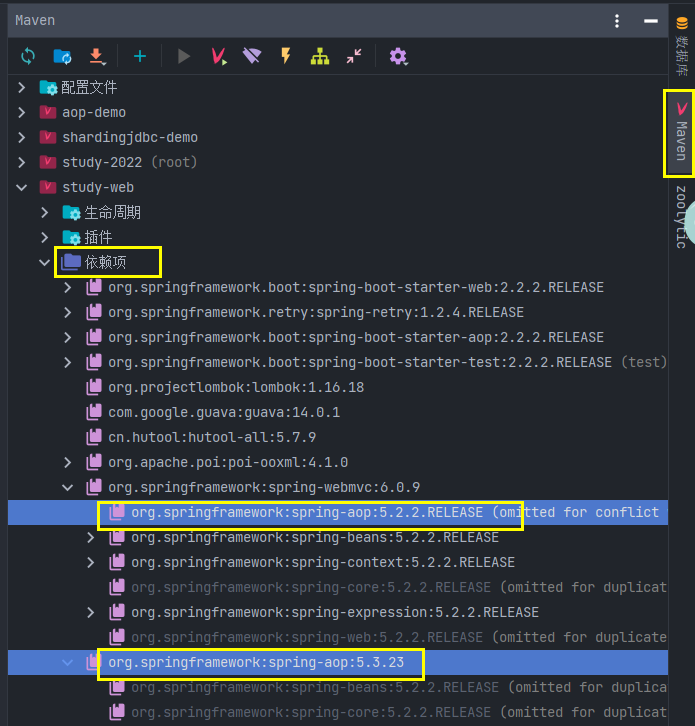
使用 mvn dependency:tree 查看依赖关系或者通过 Maven-项目-依赖项查看依赖关系
这里如果 spring-aop 冲突了,我想排除掉 spring-webmvc 中的 spring-aop,可以手动修改 pom
<dependency><groupId>org.springframework</groupId><artifactId>spring-webmvc</artifactId><version>6.0.9</version><exclusions><exclusion><artifactId>spring-aop</artifactId><groupId>org.springframework</groupId></exclusion></exclusions></dependency><dependency><groupId>org.springframework</groupId><artifactId>spring-aop</artifactId><version>5.3.23</version></dependency>
使用插件 Maven Helper
Plugin 中搜索 Maven Helper

安装,重启就可以使用了。
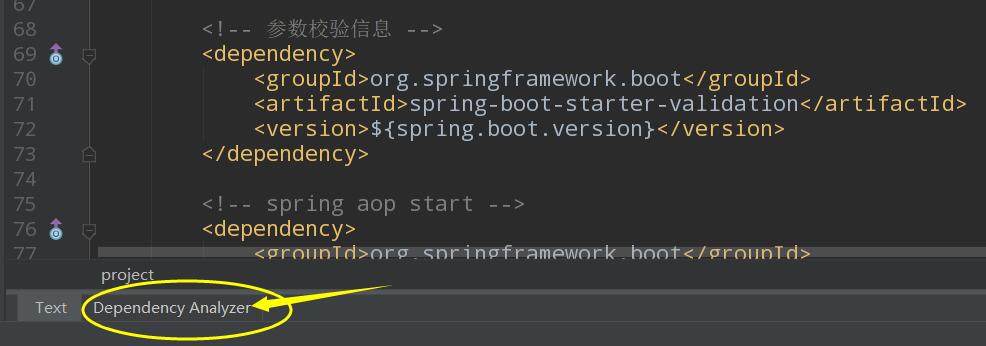
Maven Helper 使用方式:安装成功以后,打开 pom 文件,黄色箭头中内容 Dependency Analyzer 出现就是安装成功。
切换到依赖分析面板 Dependency Analyzer,然后搜索冲突的 jar,这里我搜索 eureka
在 All Dependencies as Tree 界面就可以 Exclude,很方便的找到冲突的 jar
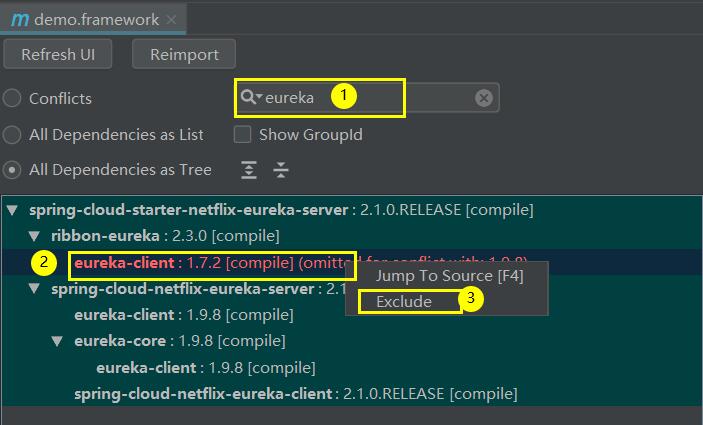
Exclude 最终也是在对应引用上添加 <exclusion> 来解决冲突
DependencyManagement 和 Dependencies
distributionManagement
<!--使用分发管理将本项目打成 jar 包,直接上传到指定服务器用来发布 jar 到 maven 仓库,repoisotry 的 id 需要与 maven 的 setting.xml 保持一致通过命令 mvn clean package, mvn deploy 发布--><distributionManagement><!-- 正式版本 --><repository><!-- nexus 服务器中用户名:在 setting.xml 中 <server> 的 id --><id>internal.releases</id><!-- 这个名称自己定义 --><name>internal repository for releases</name><url>http://localhost/nexus/content/repositories/thirdparty/</url></repository><!-- 快照 --><snapshotRepository><id>internal.snapshots</id><name>internal repository for snapshots</name><url>http://localhost/nexus/content/repositories/thirdparty-snapshots/</url></snapshotRepository></distributionManagement>